


Vinyl flooring has been a game changer for DIYers, with ever-evolving products offering durable, attractive, and waterproof coverings to suit any room of the house. From luxury planks to vinyl sheets, this practical material is a budget- and user-friendly option that can save you tons of hassle compared to other flooring options for your home. Of course, that’s assuming the surface underneath it is in pristine condition. It’s easy to forget that, while installing a vinyl floor can be simple, the subfloor needs the same attention as it would for any other flooring. Slack off with your preparation, and you could pay dearly in the form of premature flooring failure.
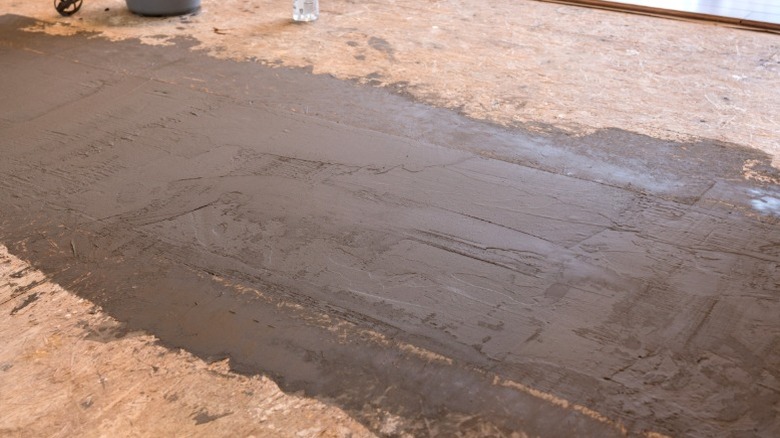
Although it can be straightforward, properly preparing a subfloor for a vinyl floor is critical in avoiding damage. To get it right, we reached out to flooring expert Skylar Bartlett, owner at Kreer Construction, for advice on setting yourself up for success. In an exclusive interview with House Digest, she underscored the importance of thorough execution and the hazards of skipping steps. “Start by thoroughly cleaning the subfloor to remove dust, debris, and residues. Once clean, inspect the surface for any uneven areas, cracks, or damage,” she explained. “Debris left on the subfloor can create pressure points under the vinyl, resulting in visible bumps or wear patterns over time.” With your subfloor cleaned and any nails and tack strips removed, you can focus on repairs to prevent damage and ensure a sturdy, flawless floor.
Expert tips to prepare a subfloor for a vinyl floor
After clearing dust and debris, Bartlett recommends checking for moisture, one of several signs your subfloor needs replacement or repair. “If moisture levels aren’t checked and managed, it can seep through the subfloor, leading to mold growth,” she stated in her exclusive House Digest interview. “Ensure the subfloor is dry by using a moisture meter, especially in basements or high-humidity areas. Excess moisture can cause the vinyl to bubble, warp, or lead to adhesive failure.”
Subfloor repairs can follow. “Use a straightedge to check for dips or high spots. Minor dips can be filled with a leveling compound, while high spots may need to be sanded down,” Bartlett stated. She added that uneven vinyl can separate and wear inconsistently, inviting moisture and creating an unattractive look. From there, you still have one more consideration before you can begin laying your floor. “Depending on the type of vinyl flooring you’re installing, you may need an underlayment. Some vinyl products come with attached underlayment, while others require a separate one,” Bartlett noted.”If your vinyl doesn’t come with an attached underlayment, invest in a high-quality one. It helps with sound absorption, moisture protection, and cushioning.”
Finishing touches for a quality flooring installation

To ensure a professional finish, Bartlett points out key general practices you might consider with any other flooring. “Before installation, let your vinyl flooring acclimate to the room’s temperature and humidity for at least 24 to 48 hours. This can help prevent issues with expansion or contraction after installation,” she said in her exclusive interview with House Digest. While those sit, you can make touchups, like cutting your door frames. “Instead of trying to fit vinyl planks or tiles around door frames, undercut the door jambs using a jamb saw. This allows the flooring to slide neatly underneath the frame for a cleaner, more seamless look,” Bartlett explained. “But be extra cautious if you attempt this yourself because that type of saw can be difficult for beginners.”
With everything prepped, give your subfloor one last assessment focusing on your particular setup. “Different types of subfloors require different preparation techniques. For example, concrete subfloors need more attention to moisture levels, while wood subfloors may need additional screws to reduce movement,” Bartlett said. “Look for anything you might have missed and ensure it’s completely dry, smooth, and secure,” she suggested, highlighting that a final once-over can ensure that you’re left with a flawless vinyl plank flooring installation.

